Running TeamCity in AKS
Update 08/06/2018: When I tried to migrate our existing server to AKS I ran into some problems where the TeamCity server would eventually become unable to pull the latest changes from GitHub. This seems to have been caused by using Azure Files. Since then I have switched us to using an Azure Managed Disk instead, and the server seems to be running with no issues. I’ve updated the section on persisting data to reflect this.
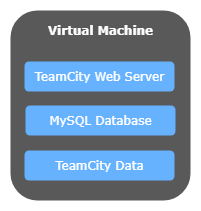
At ResDiary, we use TeamCity as our Continuous Integration server. We currently run TeamCity on a virtual machine in Azure that runs both the TeamCity web server, along with the MySQL database that stores all the build information. It looks a bit like this:
What I’d like to do is get TeamCity running on our dev tools Kubernetes cluster, move the database to a managed Azure database, and move the data into Azure Files. This should give us the following benefits:
- Upgrading TeamCity will just be a case of deploying a new version of the TeamCity docker image to the cluster.
- The TeamCity server will be able to share resources with other tools on the cluster instead of having lots of virtual machines sitting around doing nothing most of the time.
- We’ll get all the benefits of using a managed database service, including automatic backups and point in time restores.
- We should be able to take advantage of Azure Files snapshots for backing up the build server data.
Here’s a diagram showing the end goal:
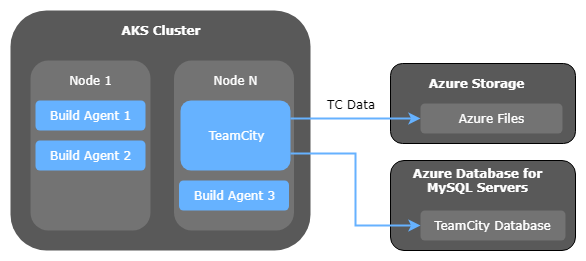
As you can see, I want to end up with the TeamCity server running as a container in the AKS cluster, storing its data in Azure Files, and using the Azure managed MySQL service. I’ve added a few other containers running in the cluster (TeamCity Build Agent 1, 2, 3) just to illustrate the concept that multiple applications end up sharing resources on the cluster, but in this post I’m just going to talk about the TeamCity server itself.
Overview
In this post, I want to cover the following topics:
- Getting TeamCity Running in AKS
- Linking TeamCity to Azure Files
- Connecting TeamCity to Azure Database for MySQL Servers
Assumptions
You can assume I already have an AKS cluster setup with the following details:
| Item | Value |
|---|---|
| Resource Group | test-group |
| Cluster Name | test-group-k8s |
Getting TeamCity Running in AKS
Before going too far, I wanted to get TeamCity running in the cluster, without worrying about storage or databases. To do this I used the basic TeamCity docker image https://hub.docker.com/r/jetbrains/teamcity-server/ and wrote a Kubernetes Deployment definition to run it with the default arguments.
The basic deployment file looks like this:
apiVersion: apps/v1beta1
kind: Deployment
metadata:
  name: teamcity-deployment
spec:
  strategy:
    type: Recreate
  template:
    metadata:
      labels:
        app: teamcity
    spec:
      containers:
        - name: teamcity
          image: jetbrains/teamcity-server:10.0.3
You’ll notice that I’ve set the strategy.type field to Recreate. This alters the way that Kubernetes deploys updates of the deployment to the cluster. The default setting is to use a rolling update, which would cause a new copy of the TeamCity server to be started before stopping the old one. This is typically the behaviour you want, but TeamCity actually only supports a single instance of the server pointing at its database, so we need to use Recreate to make sure that the current server is shut down before starting a new one.
You’ll also notice that I’ve specified a specific version of TeamCity to use (image: jetbrains/teamcity-server:10.0.3). This is just to ensure that we don’t end up automatically upgrading to a new version of the server by accident, and either have it break or update to a version that we don’t have a license for yet.
To expose TeamCity to the outside world, I added a Kubernetes Service. I know from reading the teamcity-server docker image page that the server listens on port 8111 by default, so I setup my service to create a load balancer mapping port 80 externally to port 8111 on the container:
apiVersion: v1
kind: Service
metadata:
  name: teamcity
  labels:
    app: teamcity
spec:
  selector:
    app: teamcity
  type: LoadBalancer
  ports:
    - port: 80
      targetPort: 8111
Starting TeamCity
To get TeamCity up and running, I had to deploy the deployment and service to the cluster. The deployment takes care of running TeamCity, and the service sets up a load balancer so I can access it externally. I did that by running the following command:
> kubectl apply -f .
What this does is tells kubectl to take all the files in the current directory, and apply them on the Kubernetes cluster. Kubernetes will then compare the resources in the yaml files to what’s currently running in the cluster, and will figure out what it needs to do to get into the state we want (for example, if the version of the container image has changed, it will automatically try to update the copies of that container running in the cluster).
Once we’ve done that, we can check that the deployment and services are running by using the following commands:
> kubectl get deployments
NAME                  DESIRED   CURRENT   UP-TO-DATE   AVAILABLE   AGE
teamcity-deployment   1         1         1            1           16m

> kubectl get services
NAME         CLUSTER-IP   EXTERNAL-IP     PORT(S)        AGE
kubernetes   10.0.0.1     <none>          443/TCP        49m
teamcity     10.0.64.26   52.166.150.123  80:32266/TCP   22m
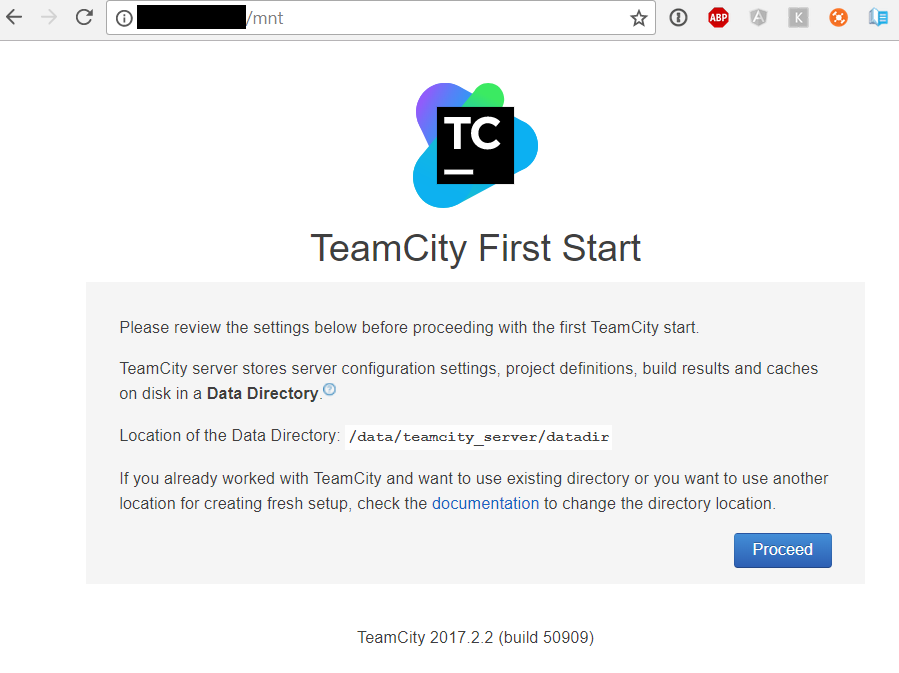
From the kubectl get services command, we can get the external IP of the load balancer (52.166.150.123), and we can go to it in a browser to check it’s running:
Linking TeamCity to Azure Files
When I originally wrote this article I suggested using Azure Files. Since then I’ve realised that there are performance issues with Azure Files that can prevent TeamCity from working correctly. As a result I would suggest ignoring the suggestion to create a new Storage Account and Storage Class, and instead just use the built-in “managed-premium” storage class when creating your Persistent Volume Claim.
TeamCity stores its configuration information, and other things like database drivers in a data directory. By default, the data is just stored inside the running teamcity container, and when the container stops the data is lost. This obviously won’t work for us, because we need the data to remain between container restarts, upgrades, etc. To sort this what we can do is create an Azure Storage account, and then map this into our container using what’s known as a volume.
To set all this up, I followed the guide at https://docs.microsoft.com/en-us/azure/aks/azure-files-dynamic-pv. A quick overview of the guide is that you need to create the following items in your Kubernetes cluster:
You can think of a storage class as a type of storage that’s available in the cluster. It’s up to designers of a cluster to define what storage classes mean. For example, it could be different types of storage (tape, disk, SSD), but you could also create storage classes for Amazon S3 buckets, Azure Storage, etc.
A persistent volume claim is a way of requesting a certain amount of storage dynamically. It defines the class of storage you want, how much storage you need, the access mode (readonly, read-write), as well as who can access the storage (a single node, multiple nodes, etc).
Creating the storage account
To begin with, I wanted to create a storage account and link it to the TeamCity container without copying over our existing TeamCity data. My reasoning for this was:
- I wanted to check that I could actually link the container to Azure Storage.
- I didn’t want to copy over our existing configuration in case my new TeamCity server started trying to run builds and interfering with our existing server.
- I realised that TeamCity doesn’t come bundled with a MySQL driver, so I needed to copy that in myself.
I started by creating a storage account as follows:
> az storage account create --resource-group MC_test-group_test-group-k8s_westeurope --name our-storage-account-name --location westeurope --sku Standard_LRS
_NOTE: When I originally tried this, I accidentally created this against the test-group resource group. It turns out that when you create the AKS cluster, it creates another resource group as part of this process that starts with MC_. It’s actually this resource group you need to reference when creating your storage account._
Defining the Storage Class
Once the storage account had been created, I created a Storage Class:
kind: StorageClass
apiVersion: storage.k8s.io/v1
metadata:
  name: azure-file
provisioner: kubernetes.io/azure-file
parameters:
  storageAccount: our-storage-account-name
This class can be shared by any of the containers in the cluster. So you can create a single storage class to provide access to your storage account, and then create as many shares as you need within the storage account to actually store the data. The metadata.name, provisioner and parameters.storageAccount are the really important pieces of information here.
metadata.name is just the name of this class of storage in the cluster - you can change this to whatever you want. provisioner tells Kubernetes that we’re using Azure Files. And parameters.storageAccount should be set to the name of your Azure storage account.
Defining the Persistent Volume Claim
I then created a persistent volume claim to set aside a piece of storage for TeamCity:
apiVersion: v1
kind: PersistentVolumeClaim
metadata:
  name: teamcitydata
spec:
  accessModes:
    - ReadWriteOnce
  storageClassName: azure-file
  resources:
    requests:
      storage: 100Gi
You’ll notice that this claim references the storage class we had created previously (storageClassName: azure-file), requests 100GB of storage (storage: 100Gi), and names the claim teamcitydata.
The accessModes part defines how the storage can be accessed by the containers that need to use it. Full details of the available access modes can be found at https://kubernetes.io/docs/concepts/storage/persistent-volumes/#access-modes, but ReadWriteOnce means that the volume will be available for read-write access by a single node.
Connecting the Storage to TeamCity
Once we’ve defined our storage, we can alter our deployment.yaml file to link it to the storage account:
apiVersion: apps/v1beta1
kind: Deployment
metadata:
  name: teamcity-deployment
spec:
  strategy:
    type: Recreate
  template:
    metadata:
      labels:
        app: teamcity
    spec:
      containers:
        - name: teamcity
          image: jetbrains/teamcity-server
          volumeMounts:
            - mountPath: "/data/teamcity_server/datadir"
              name: teamcitydata
      volumes:
        - name: teamcitydata
          persistentVolumeClaim:
            claimName: teamcitydata
The new volume and volumeMounts sections in the deployment file mount our new volume onto the /data/teamcity_server/datadir directory inside the teamcity container.
A small note on debugging issues with persistent volumes
Originally I made a typo in my persistent volume claim where I misspelled the name of the storage class. This caused the deployment to fail to start because it couldn’t get access to its storage.
To list your persistent volume claims you can run the following command:
> kubectl get pvc
NAME           STATUS    VOLUME    CAPACITY   ACCESSMODES   STORAGECLASS     AGE
teamcitydata   Pending                                      rdteamcitydata   40m
To get more details about a particular claim, you can run the following:
> kubectl describe pvc teamcitydata
Name:           teamcitydata
Namespace:      default
StorageClass:   rdteamcitydata
Status:         Pending
Volume:
Labels:         <none>
Annotations:    kubectl.kubernetes.io/last-applied-configuration={"apiVersion":"v1","kind":"PersistentVolumeClaim","metadata":{"annotations":{},"name":"teamcitydata","namespace":"default"},"spec":{"accessModes":["Rea...
Capacity:
Access Modes:
Events:
  FirstSeen     LastSeen        Count   From                            SubObjectPath   Type              Reason                  Message
  ---------     --------        -----   ----                            -------------   --------  ------                  -------
  40m           39s             162     persistentvolume-controller                     Warning           ProvisioningFailed      storageclass.storage.k8s.io "rdteamcitydata" not found
Connecting TeamCity to Azure Database for MySQL Servers
Creating the database
We needed a MySQL database for TeamCity to store its build information in. Until now this had just been running on the same VM that runs TeamCity, but I want to run it on a managed MySQL instance in Azure so that we can get the same benefits that we get with Azure SQL Server where backups, replication, etc are all taken care of for us.
To do this I went to the “Azure Database for MySQL servers” section of the Azure portal:
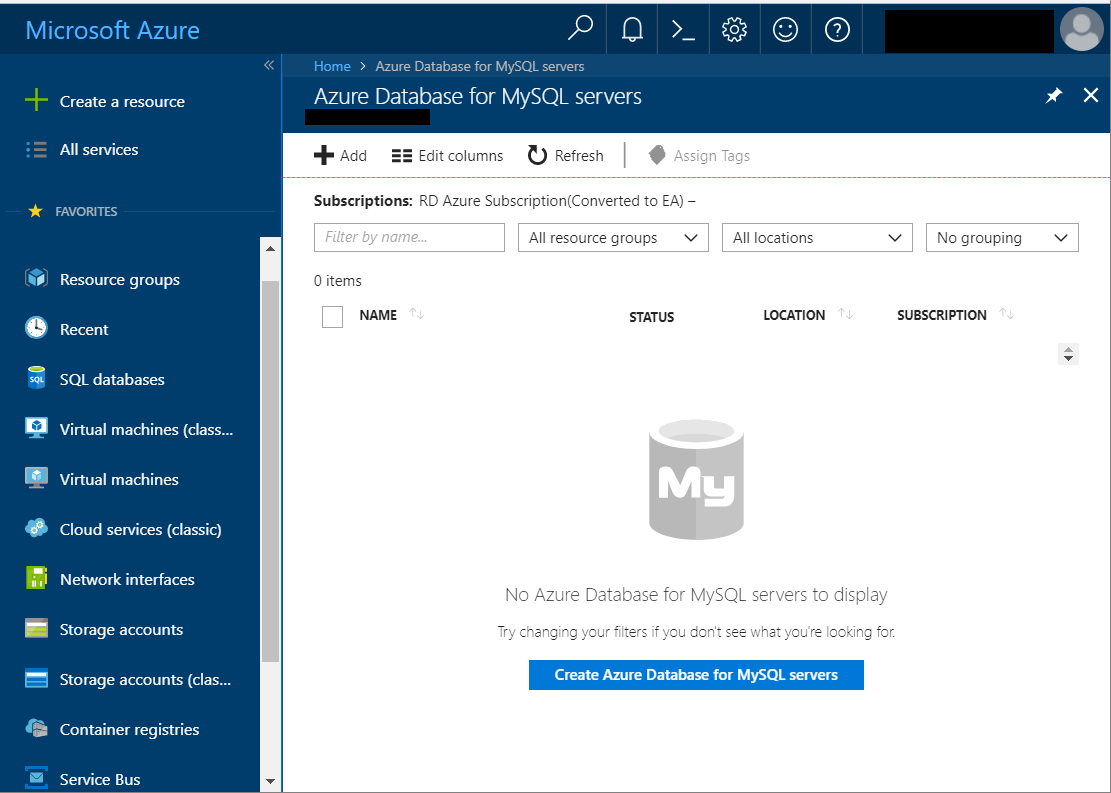
From there I clicked on the Create Azure Database for MySQL servers button, and filled out the info required to create the server:

I chose the basic pricing tier for now to keep costs down, but if we find performance issues later on we can always change this. I should note that at this point Azure doesn’t support switching from Basic to Standard after the server has been created, but worst case scenario we can always take a backup of the database and restore it after recreating the server.
Preparing the database for TeamCity
Before TeamCity was able to connect to the database, I had to do a couple of things:
- Disable SSL connections being required by the server.
- Allow the TeamCity server’s IP to connect to the MySQL server.
- Create an empty database for TeamCity to use.
To disable the SSL connection requirement and allow TeamCity’s IP, go to the “Connection Security” section of the Azure portal:
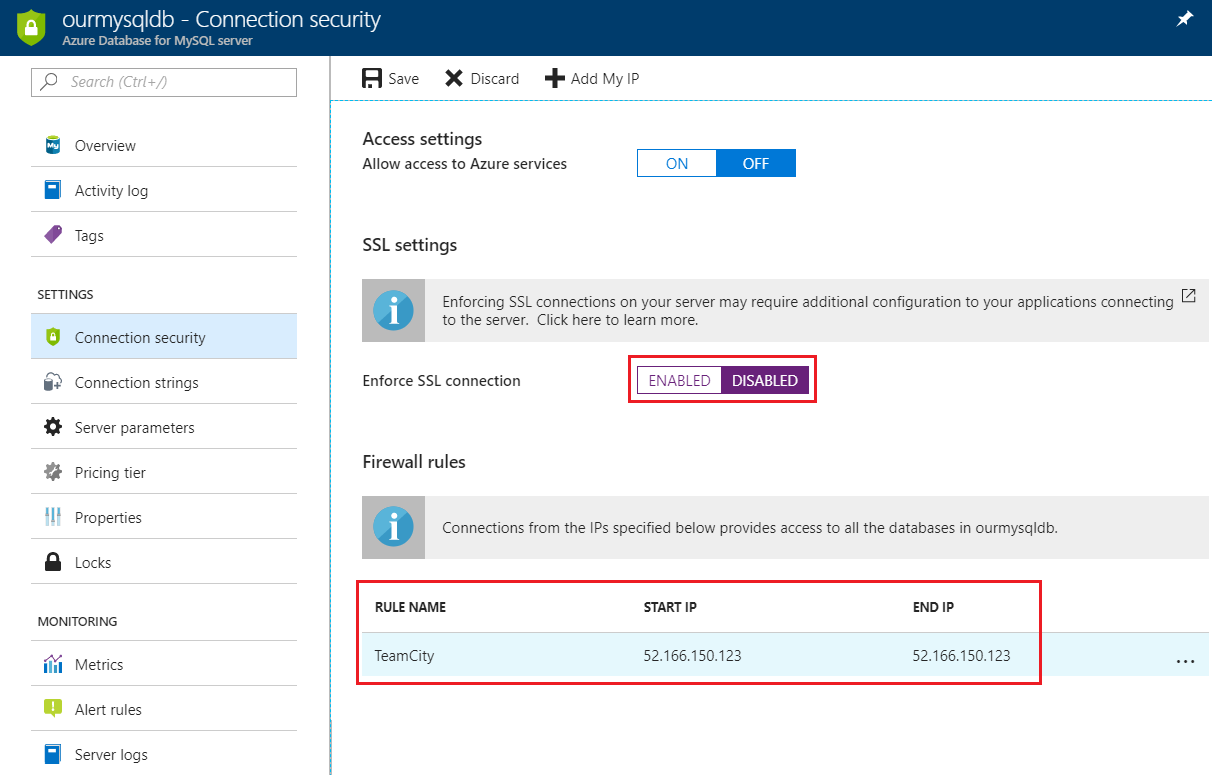
NOTE: It might not be necessary to disable the SSL connection requirement. I just didn’t spot an obvious way to specify it via the TeamCity UI and didn’t feel like wasting time right now. It might just be a case of manually specifying the connection details in one of the TeamCity config files.
To create the empty database for TeamCity I connected to the database server and then followed the instructions on https://confluence.jetbrains.com/display/TCD10/Setting+up+an+External+Database#SettingupanExternalDatabase-OnMySQLserverside:
> mysql --user=mysqladmin@ourmysqldb --host=ourmysqldb.mysql.database.azure.com -p
mysql> create database teamcity collate utf8_bin;
Query OK, 1 row affected (0.34 sec)

mysql> create user teamcity identified by '<insert password>';
Query OK, 0 rows affected (0.23 sec)

mysql> grant all privileges on teamcity.* to teamcity;
Query OK, 0 rows affected (0.24 sec)

mysql> grant process on *.* to teamcity;
Query OK, 0 rows affected (0.21 sec)
Connecting to the database
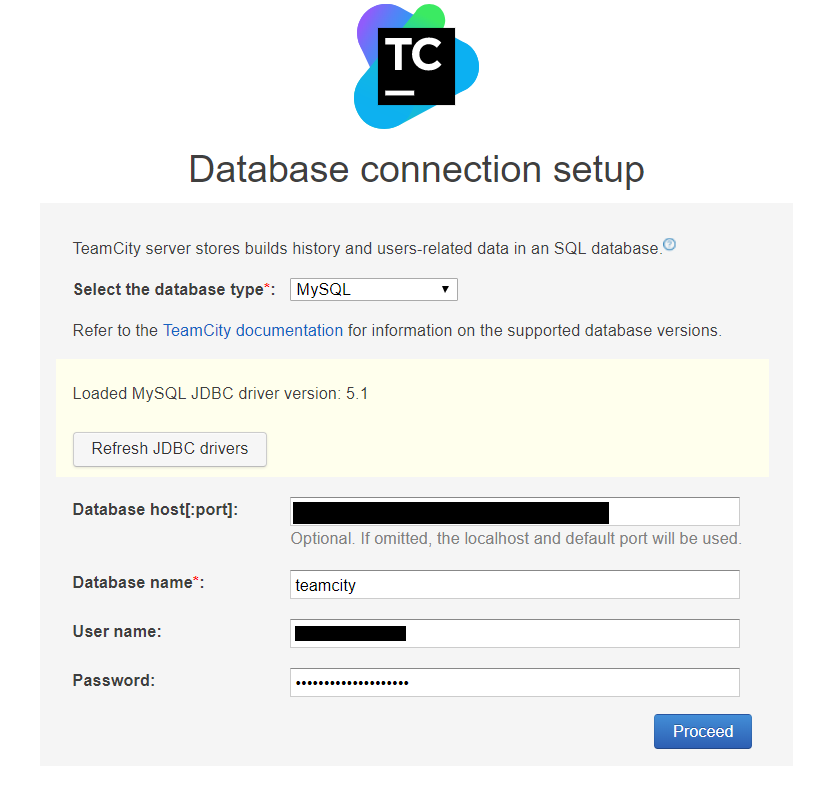
Once the database was created, I followed the instructions in the TeamCity UI to start the setup process. At the point of choosing the database, I chose to use a MySQL database. Initially I got a message explaining that the MySQL driver wasn’t present, so what I had to do was download it from http://dev.mysql.com/downloads/connector/j, manually upload it to the lib/jdbc directory of the teamcity data share in the Azure storage account, and then click on the button to refresh the available drivers.
Once the driver was loaded correctly, I entered the connection details for the database and clicked on the “Proceed” button:
TeamCity then takes you through the initial install process, and sets up the server. At this point you should have a fully working TeamCity server connected to Azure Storage for persistence, and a hosted Azure MySQL server database!
Some observations on using MySQL
I want to point out that I’m not very familiar with MySQL - my background is mainly in SQL Server and Oracle. I also develop in a Windows environment at work, which can sometimes make it a bit tricky to get access to dev tools. Here’s some problems that tripped me up:
- I couldn’t get MySQL workbench to connect to the Azure MySQL server regardless of what I tried. I ended up using the
mysqlcommand line tool which worked fine. - I struggled to find a copy of the
mysqlcommand line tool without having to download the full server, but finally found a chocolatey package that had it (https://chocolatey.org/packages/mysql-cli). - I constantly forget that you have to end commands in the
mysqlcommand line tool with a semi-colon (;), otherwise it assumes you’re writing a multi-line command.
Wrapping Up
In this article I’ve shown how to run a TeamCity server in a managed AKS cluster, using Azure Files for storage, and Azure Database for MySQL Server for the database. One thing that I haven’t covered here is how to go about migrating an existing server. I’ll cover that in a follow up post.